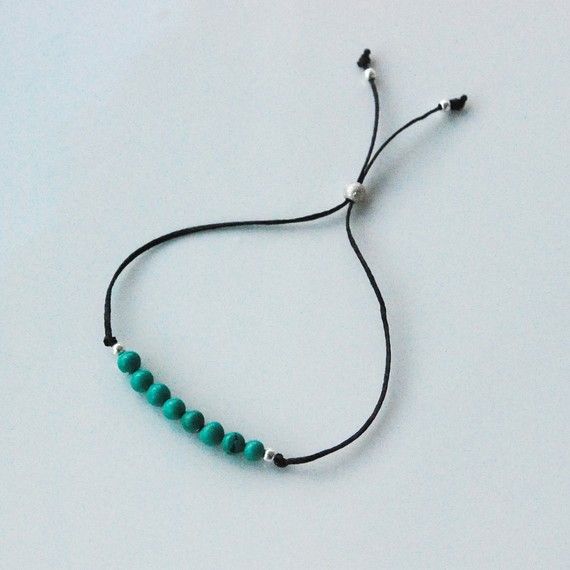
How to Make an Adjustable Bracelet Easy?

Sending
User Review
0 (0 votes)

Adjustable bracelets are a great way to add a touch of style to your outfit without having to worry about them fitting perfectly. They’re also a great option for people with different wrist sizes.

In this tutorial, we’ll show you how to make an adjustable bracelet using a basic beading technique.

Supplies:

  • Beading wire
    Beading wire
  • Beads
    Beads
  • Crimp beads
    Crimp beads
  • Crimping pliers
    Crimping pliers
  • Wire cutters

Instructions:

  1. Cut a piece of beading wire that is about 3 times the circumference of your wrist.
  2. Thread on your beads, leaving a few inches of wire at each end.
  3. Slide on a crimp bead onto each end of the wire.
  4. Use your crimping pliers to crimp the crimp beads closed.
  5. Trim off any excess wire.

Here are some tips for making your adjustable bracelet:

  • Use a variety of beads to create a unique look.
  • If you’re using small beads, you may want to use a beading needle to thread them onto the wire.
  • To make your bracelet more secure, you can use two crimp beads on each end.

Here’s a video tutorial that shows you how to make an adjustable bracelet:

Variations:

  • You can use different types of beading wire, such as nylon or metal.
  • You can use different types of crimp beads, such as round or oval.
  • You can add charms or other embellishments to your bracelet.

Experiment with different designs and materials to create your own unique adjustable bracelet.

Here are some additional tips for making an adjustable bracelet:

  • If you want your bracelet to be more adjustable, you can use a longer piece of beading wire.
  • To make your bracelet more secure, you can use a smaller crimp bead.
  • To make your bracelet more durable, you can use a stronger type of beading wire.

With a little practice, you’ll be able to make your own adjustable bracelets in no time.

We look forward to your comments and stars under the topic. We thank you 🙂


İlginizi Çekebilir:How to Make a Flower Wall?
share Share facebook pinterest whatsapp x print

Related Posts

How to Do Polygel Nails at Home Step by Step how to do polygel nails Learning how to do polygel nails will help you have beautiful, longer nails that look great all the time. While you can use this product on natural or acrylic nails, you will want to start by using a nail drill for better results. The main difference between polygel and regular polish is the thickness of polygel. You need a small amount to create a thick layer that will last up to two weeks. After your gel is applied, you should use acetone to soften it. The first step in applying polygel is to make sure that your nails are clean and moisturized. Once you've done that, you can prepare them by pushing down your cuticles. You can also use rubbing alcohol or any other type of nail form to make sure your nails will not lift. Afterwards, you can paint your nails with regular nail polish or a design. If you're unsure about the process, you can visit a nail tech for a professional application. Next, you'll need a base coat. This is the step that will help the polygel to grip to your nail. It is important to use a quality base coat so that the polygel will hold to your natural nail. After that, you'll need to dry the gel with an UV lamp. Then, you can apply your top coat. Once it's dry, the topcoat will cure in about five seconds. After you've prepared your hands with rubbing alcohol, you'll need to apply the topcoat. This will protect your polygel and make it more durable. The final step is applying a topcoat. If you're going to use a topcoat, make sure to use a high quality one. Then, you'll need an LED lamp to cure the gel. Lastly, you'll need a good LED lamp to cure the polygel. To prepare your hands, you'll need a good quality cuticle oil or lotion. These products will prevent the Polygel from sticking to your natural nail and will prevent any sticky residue. You'll also need to use a pH-based primer to protect your hands after the procedure. Finally, you'll need a UV or LED lamp to dry your nails. It is essential to prepare your hand before doing this technique. Before starting the polygel application, you must clean your natural nails and prepare them for the application. You should use a brush to smooth out any irregularities. Then, you'll need a base coat that protects your natural nail. Then, you can apply the polygel on the top and bottom of your fingers. You can then file them or shape them to your liking. Then, use a UV lamp to cure your new nailpolish. Polygel is a popular choice among beauty enthusiasts. It is safe for the nails and does not require an application process. It will last for a long time and can be applied by anyone. The process is easy to perform, but you should be aware that it can be damaging. You should use a base coat before you apply polygel. A light cure is important to prevent damage to your nails. After your base coat is applied, you must wait at least 60 seconds. Then, the polygel will be tacky and ready to be used. Once the base coat is applied, you should apply the polygel on the nail. You should use a brush to apply the gel to your nails. After applying the gel, you should shape your nails and apply the top coat. You can also use a dual form to apply the polygel to the cuticle area. While applying polygel, you should apply a base coat and a topcoat. You should also carefully touch the dual form to ensure even coverage. Once you have shaped your nails, you should prepare your hands with a nail dehydrator. You can also use a polygel brush to apply the polish to your nails. The Slip solution helps you shape the polygel easily and is very important for a long-lasting manicure. When applying polygel, you should also use a nail dehydrator to remove oils from your hands. A nail dehydrator will help you remove the oils in your hands and will also be useful in removing the traces of the previous polishes on your nails.
How to Do Polygel Nails at Home Step by Step
Fashion And Tech Join Forces To Create A Dress
Metal Artifacts in SE Asia Challenge Long-held Theory
How Do You Get Pink Eye
How Do You Get Pink Eye?
Wavy Hairstyle For Men
how to paper mache?
how to paper mache?

Leave a Reply

Your email address will not be published. Required fields are marked *

Translate »
Privacy Overview

This website uses cookies so that we can provide you with the best user experience possible. Cookie information is stored in your browser and performs functions such as recognising you when you return to our website and helping our team to understand which sections of the website you find most interesting and useful.

How To Make Easy | © 2023 |