How to Do Makeup Like a Pro?
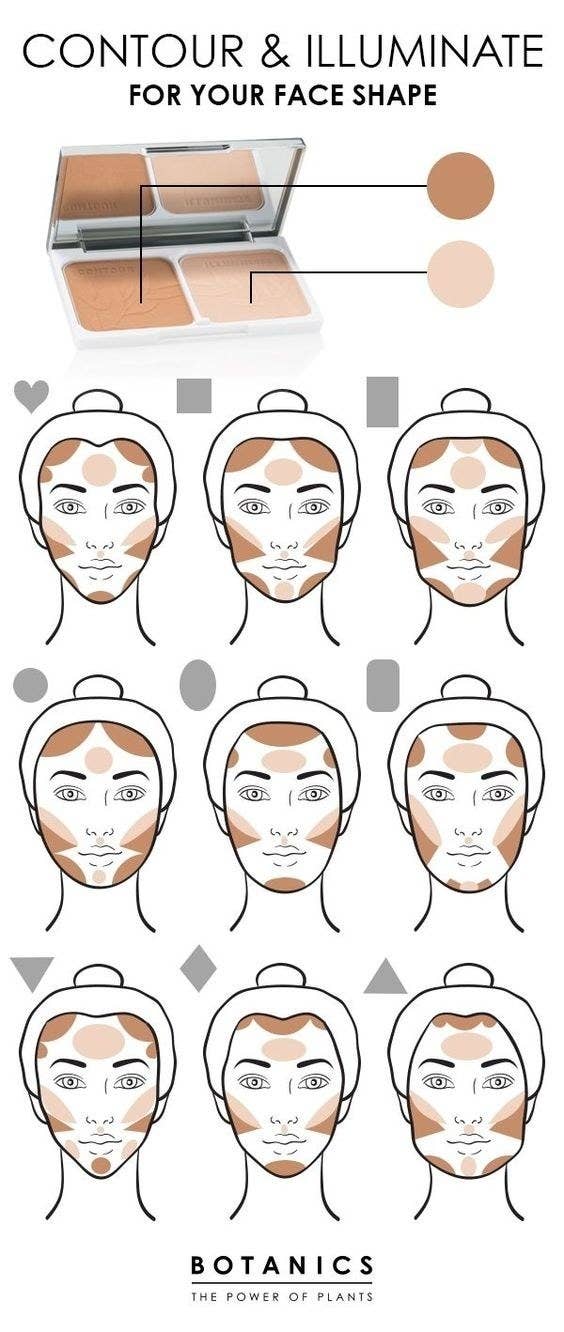
- How to Do Makeup Like a Pro?
- Setting spray
- Setting powder
- Face primer
- Liquid liner
- Sponge application
- Using a foundation brush
Learn how to apply eye shadow, liquid liner, and mascara in this easy video tutorial. Follow Iren’s tips and get camera-ready in no time. You’ll be amazed at how easy it is to look beautiful! Just take a few minutes to watch the tutorial to learn how Iren does her makeup! You’ll feel like a pro in no time! And who said that makeup is only for girls? Iren shares her secrets to look beautiful on a budget!
Setting spray
In addition to setting powder, you can buy a setting spray to extend the wear of your makeup. Some setting sprays are dewy, while others are more mattifying. While it can be tempting to choose a dewy one, you need to remember that it should not be greasy and should not leave behind a dewy layer on the skin. Setting spray for makeup also offers many other benefits, such as smoothing, nourishing, protecting, and moisturizing. Read reviews and select a product that best suits your needs.
Setting sprays are essential to the longevity of your make-up, and are an excellent option for preventing smudging. A good setting spray will prevent your make-up from melting off by lunchtime. That means no more sweaty foreheads, creased eye shadow, or smudged mascara. These problems only get worse during the hotter months, so you can’t risk skipping this step! By using a good setting spray, you can look your best for the whole day.
Applying a setting spray is a great finishing touch for any makeup look. Make sure to shake the bottle before applying. You may need to shake the bottle a bit to activate the formula. Hold the bottle at a distance of six to eight inches from your face and spray evenly over your face and neck. Then, allow the setting spray to dry naturally. It’s a quick, easy way to maintain your makeup and protect it from flaking.
Setting powder
A key step in doing makeup is using a setting powder. This type of powder sets makeup and prevents shine. It can also cover zits and pimples to prevent your makeup from fading away. Makeup that’s not set correctly can look ashy, shiny, and even look dingy. It can also help you achieve a natural-looking glow. Read on to learn how to use setting powder properly.
You can use either a brush, sponge, or fingers to apply the powder. When applying the setting powder, don’t rub it in. Let it sit for a few minutes. This will help the powder absorb any excess makeup. Then you can finish off your makeup and look great. It’s time to put on the finishing touch! Here are some simple tips to help you achieve flawless skin every time. You can even combine finishing powder with setting powder to give your makeup a glowing finish.
Apply setting powder wherever you want to reduce shine and make your makeup look perfect. The traditional method of setting powder is to cover your entire face, but the era of fresh, dewy skin has made strategic powder placement much more popular. You can apply setting powder on your chin, nose, and cheeks. Anywhere you want to cover up excess grease, you can use setting powder to cover it. It’s best to use a brush for setting powder and a large powder brush for pressed powder.
Face primer
 When doing makeup, using a face primer is essential to ensure that your makeup will stay in place all day long. Applying it right after a skin care routine will prevent your makeup from moving around, and it will also provide smoother application. If you want to wear your makeup for a longer time, you can layer face primers for different skin concerns. However, make sure that you choose a primer that is suitable for your skin type and tone.
One of the most popular face primers is from the brand Liquid Silk Canvas. Megan Markle’s makeup artist, Daniel Martin, uses this product. It has a silky, oil-free texture, and is infused with botanical and silk powder extracts. These ingredients work to even out skin tone and make application of foundation easier. While some people are afraid to use a primer, many celebrities swear by it.
There are many types of face primers on the market, each with its own benefits. Some are hydrating, while others are mattifying. Others are color-correcting. Makeup primers fall into two categories: water-based and silicone-based. The type that best suits your skin type will depend on your preferences and desired results. You can find out which one is right for you by reading the ingredients of the primer.
Liquid liner
There are a number of ways to apply eyeliner, and the two most common are liquid pens and gel pots. Choosing the right one will really depend on your preferences. Pens can be easy to apply and require a steady hand, but gel liner is more forgiving and allows you to build up the thickness of the line. Dang’s tip for creating a sleek, even line is to use a small, angled brush.
Some women make the mistake of not giving the eyeliner enough time to dry. If you have a slow hand, a cotton swab dipped in micellar water can fix any mistakes. Make sure to use waterproof liner, such as L’Oreal Paris Micellar Cleansing Water. If your hands are shaky, take your time. Moving slowly and carefully is the key to achieving a perfect line.
Before applying liquid liner, make sure you have your eyelid primer and eyeshadow in place. Apply the liner with short, smooth strokes, and remember to blend the line. This technique is also ideal for people with upturned or almond eye shapes. Hold the liner in your hand and tilt your head back slightly so that you can see the upper lash line. Once you’re satisfied with the line, finish off with mascara to complete your makeup look.
Sponge application
When you first start using a makeup sponge, it’s important to wet the sponge well before applying the product. This will prevent it from absorbing too much product and resulting in streak-free coverage. If your skin is dry, a wet sponge will also make it easier to blend powder formulas without causing them to look cakey. This article will show you how to wet a makeup sponge correctly. Let’s start with a simple example.
Begin by rubbing the large side of your makeup sponge against your skin. Then, apply your makeup to the sponge using a stippling motion, or by gently bouncing the sponge against your skin in small, circular motions. This will help blend the product into the skin and provide an even and smooth finish. This step is important because the makeup sponge can become stained over time and needs to be cleaned frequently to avoid the risk of acne.
Next, you need to choose a sponge for your skin type. There are sponges designed for different types of makeup, and some are better than others. A silicone sponge, for instance, is made to prevent product from transferring to the sponge. The silicone will also prevent any spillage and ensure the consistency of the product. After applying your makeup with a sponge, you can simply wash the sponge to remove excess product. Then, you can apply more makeup as desired.
Using a foundation brush
A good foundation brush is essential when you’re applying your foundation to your face. Its dense bristles and angled pyramid-shaped head make it easy to blend and buff without leaving streaks. This type of brush is ideal for blending foundation over your entire face, including hard-to-reach areas. The wide brush head also prevents the need for smaller, fluffy brushes that can create streaks.
If you have oily skin, dab small dots of foundation onto your T-zone. Then, use the foundation brush to blend it into your skin, starting from the center and moving outward. If you’re applying foundation to your nose, your foundation brush should be dampened first and then you should dry it with a towel after. Too much water will dilute your foundation, making the coverage ineffective. When you’re applying foundation, guide the brush in even strokes, avoiding harsh lines.
A foundation brush has multiple uses, allowing you to do more than one makeup task. For instance, a fluffy foundation brush can be used to apply highlighter on your temples and spot-correct your skin. Another type of foundation brush is a stippling brush, which has alternating layers of fibers of different lengths. This type of brush is ideal for layering makeup, as it allows you to seamlessly work your foundation with blush and primer.
We look forward to your comments and stars under the topic. We thank you 🙂