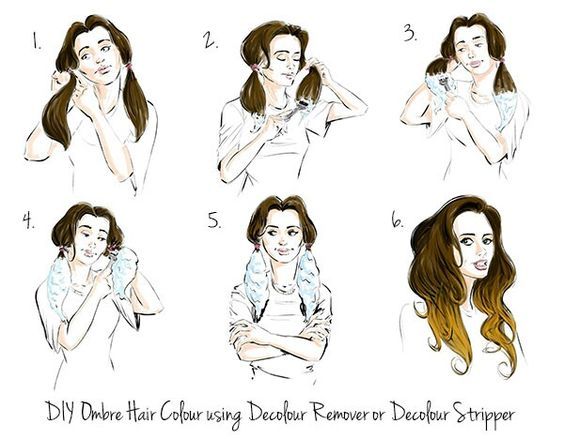
How to Do Polygel Nails at Home Step by Step

- How to Do Polygel Nails at Home Step by Step
- Gel-acrylic hybrid formula
- UV lamp-free application
- Preparing the nail
- Adding top coat
User Review
( votes)If you are looking for a DIY method of applying a gel-acrylic hybrid nail polish, you should consider doing it at home. The following are some tips to make the process as easy as possible. First, choose the right dual form size. Ideally, it should be slightly larger on one side than the nail’s actual diameter. Once your nail has been shaped, you can start applying the polygel. After the nail has been applied, wait 45-60 seconds under UV or LED light to dry completely.
Gel-acrylic hybrid formula
 If you’ve always wanted to learn how to make gel-acrylic hybrid nails at your own home, you’re in luck. There are many ways to do so, and each method is a bit different. One way is to use a nail polish that combines both types of nail polish. This type of nail polish is thicker and more difficult to apply than regular nail polish. It also requires longer UV curing time.
First, you need to know what type of gel you have. There are two basic types of gel: hard and soft. Hard gels are non-porous and are resistant to acetone, whereas soft gels are porous and can be removed with acetone. Once you’ve chosen a type of gel, make sure you paint the entire nail with it. It’s important not to apply the gel too thick, as it will not dry properly. You’ll then want to cure the gel by using an LED lamp for 30 seconds.
If you’d like to get long, voluminous nails, or nails with more shine, you’ll likely prefer acrylic nails. But acrylics tend to break more easily than polygel. Regular gel can be quite thin, which can be damaging to your natural nail. A polygel formula is much sturdier and lighter, yet retains the durability and flexibility of acrylics.
Another option is to mix acrylic powder with nail polish. These hybrid nails last anywhere from a few weeks to several months. And they can be custom-made according to your tastes and preferences. They can be applied to your natural nails or nail extensions. This method has several advantages.
If you’d like to make gel-acrylic hybrid nails at your own home, here are a few tips: First, you must roughen up your acrylic nails. If the surface is too smooth, the gel polish will not adhere. You can use a fine-grit emery board or a buffer file to do this. A buffer file is especially helpful because it is gentle and effective around the cuticle area.
UV lamp-free application
UV lamp-free application of polygel nails is an option for people who don’t have access to a UV lamp. This method is similar to applying acrylic nails but doesn’t require UV light. To get this effect, you must first apply a thin layer of polygel onto your nail. Dip your brush into a slip solution and spread the gel evenly along the cuticle line. Flip your nail over and smooth the excess gel out with a wet brush. If your nail is a bit thick, you can use a nail file or nail drill to thin it out. Once the polygel is applied, you can finish your look with a top coat if desired.
Polygel nails are a combination of acrylic and gel products. The main difference between them is that polygel is thicker and more flexible than acrylic. It also doesn’t have the chemical odor of acrylic. If applied properly, polygel will feel just like natural nails. If you’re not a nail expert, it may be best to consult a professional. Polygel is available in a variety of colors, and you can use one tube for one color, or several colors to create different designs.
For those who don’t have access to a UV lamp, polygel kits are a good choice. These kits contain a UV lamp, various colors of gel, application tools, nail molds, and instructions. You can even use the polygel as a regular nail polish if you don’t have a UV lamp. A UV lamp will not harm your natural nail more than a regular polish, and you don’t need an expensive lamp to get a great effect.
Polygel nails can be applied at home just like acrylic nails, but they’re much stronger than acrylic nails. With proper care, you can create stunning polygel nails and get them looking fabulous for years to come. And if you’re not sure you’re ready for acrylics, you can also try out polygel nails at home!

If you don’t want to go to the salon to get your nails done, you can also use an LED lamp at home. LED lamps are much better than UV lights because they cure your polish in 45 seconds, whereas UV lights require 8-9 minutes. Moreover, you don’t have to worry about the UV light causing damage to your skin if you use an LED lamp. You can also set a timer on your smartphone to make the process faster.
Preparing the nail
There are a few things that you should do when preparing a polygel nail at home. First, make sure your nails are clean and dry. You should also push the cuticles down. Lastly, make sure that your nails are moisturized. This will prevent the polygel from lifting and sticking to your nails.
As with any acrylic or gel nail, it is very important to take the right steps when preparing a polygel nail. By using the proper tools and techniques, you can prepare your nails at home without worrying about damaging them. Then, you can easily file off the polygel by using acetone.
To apply the PolyGel nail overlay, you must use a thin spatula and apply it onto the nail. You can also use a nail brush that is dampened with rubbing alcohol or slip solution. After applying the polygel, wait for it to set for 30 seconds before you apply the topcoat.
If you do not have the time to visit a salon, you can try preparing the polygel nail at home. It is similar to applying acrylic nails, but has much greater durability. You can also use a polygel kit, which is available online. These kits can come in different colors and can be used multiple times.
You can choose a shade from the shades that are available for polygel. You can also combine different colors to create a custom design. In addition, you can use a nail file, buffer, and surface cleaner to prepare your nails for the polygel. After the application, you can use a dual form or a cuticle brush to shape the polygel. You can also use a spatula to distribute the polygel evenly.
The PolyGel nail is very easy to apply at home. You just need to follow a few simple steps. Make sure to get the correct tools for the job.
Adding top coat
 You can add a top coat to polygel nails at home to protect them from staining and water damage. A clear coat prevents stains and scratches, and also helps polygel nails last longer than without it. However, polygels do not last as long as acrylic nails, so you should not expect them to last as long.
When you want to add top coat to your polygel nails, first prepare your nails. Choose a kit that is designed for your fingernails and the length you want. Next, clean your nails with a nail polish remover or rubbing alcohol. You can also use a nail file to get the shape you want.
After applying base coat and primer, you are ready to apply polygel to your nails. To apply polygel, use a two-sided metal tool with a brush and a spatula. Use the spatula to drop a small amount of polygel onto your nail. The brush can then be dipped into slip solution and sculpted into long, ultra-long extensions.
When applying polygel to your nails at home, it is important to ensure that your nails are completely clean. This prevents peeling and lifting of the nail. The polygel should last for two to three weeks if you wear it gently. If you don’t remove the polygel at the recommended time, it may lift and peel off.
It is important to follow the proper instructions for each product. Make sure that you use the correct brush for each product. Do not use the same brush for acrylic and polygel. This could create bubbles and leave your nails lumpy and unattractive. Also, using the wrong brush will cause the top coat to be thicker and take longer to dry. As a result, using separate brushes is recommended.
If you want to apply polygel nails at home, you need to know how to properly apply it. The material has a putty-like consistency and needs to be spread along the nail. For best results, use a brush dampened with a slip solution to prevent the polygel from sticking to the brush. Once it is applied, you can use the polygel to sculpt your nails into a custom shape. You can even make your nails look like stilettos with a little practice!
We look forward to your comments and stars under the topic. We thank you 🙂