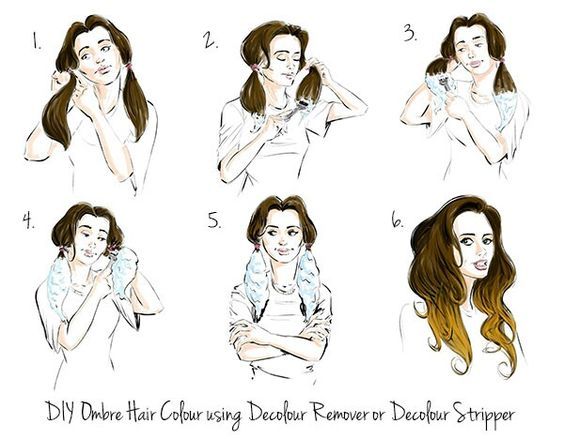
How to Make Finger Coils? Step by Step
- How to Make Finger Coils? Step by Step
- Section your hair
- Apply a hydrator at night
- Apply SKIMDO enhancer
- Apply a hydrator during the day
User Review
( votes)Before you get started, it’s a good idea to section your hair. This will make your fingers easier to manipulate. Also, you’ll need to apply a hydrator at night to keep your hair moisturized. During the day, you can use a SKIMDO enhancer.
Section your hair
 To get finger coils, you need to split your hair into two sections. Depending on the thickness you want, you may need more or fewer sections. You will also need to apply hair gel to the ends to prevent frizz. To begin, you need to wet your hair thoroughly. Use a rattail comb to part the hair into two sections.
Once you’ve wetted your hair, separate it into two or more sections. Use a rattail comb or your fingers to separate the sections evenly. If your hair is thick and long, this process can take up to two hours. After dividing your hair, apply a setting lotion or cream to each section. Finger coils can be thick or thin, but you must make sure you apply it evenly.
Finger coils require a bit of patience. The hair will take about two hours to complete, but it may take longer if you’re a beginner or your hair is thick. If you want your finger coils to last longer, you need to keep them moisturized. Also, you should not pull too tightly on them, as this can damage your scalp and cause hair fall out. Also, try using a satin bonnet or an elastic band to protect your finger coils while you sleep.
Once you’ve done all of the steps above, it’s time to apply the finger coil styling product. A styling gel or curl cream is ideal, because it helps provide hold and moisture. Remember, don’t overdo it, too much product can cause flaking and your hair may take longer to dry. Once you’ve applied your styling product, start to twirl your hair around your finger. Start from the roots and work your way down to the ends. Repeat this process until you’ve finished your entire head.
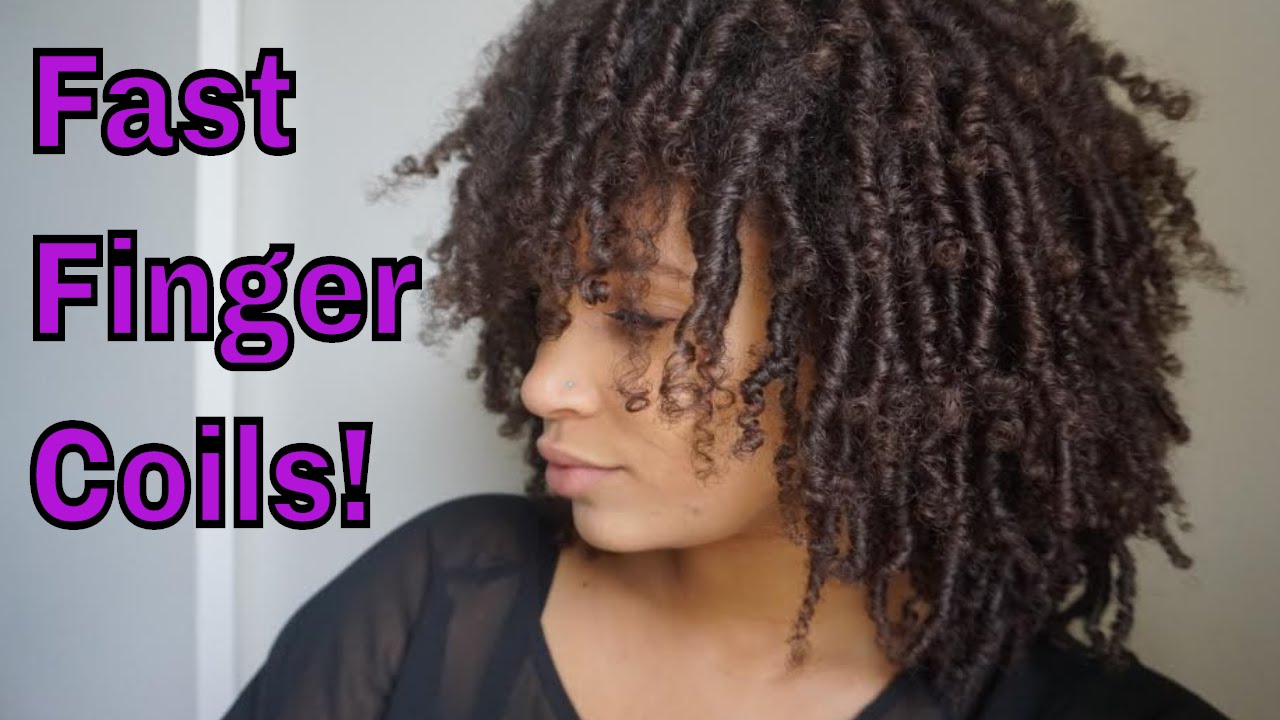
Finger coils are a great option for natural hair types, and they can work on all lengths and curl patterns. However, you should take extra time to get your coils if your hair is damaged or needs repair. You may want to try using a deep conditioner that helps to repair damaged hair.
Apply a hydrator at night

The best way to keep finger coils in place is to apply a hydrator to them at night. You can do this if you notice that the coils have lost their shape or need refreshing. To tell if your coils need hydration, feel your hair and look for puffy, dry coils. This is a great time to apply a hydrator, which can hydrate your coils for up to two weeks.
Finger coils will last about two to three weeks, depending on how well you take care of them. To keep finger coils in place, apply a hydrator and oil before bedtime. If you want to keep them looking great for a longer period of time, you can apply a curl refresher or dry shampoo to keep them from frizzing. Using a silk bonnet or scarf can also help your finger coils stay in place.
Finger coils are the best way to get a curly look fast and easily. The process is simple. Section the hair into sections and apply a leave-in conditioner. You can then finger coil from the root to the tips. The coiling process should take between an hour and two hours. Once you’ve finished, remove the bonnet and let your finger coils cool down. You can also apply a hydrator at night to prevent your finger coils from becoming dry and brittle.
Finger coils can be done by anyone. The length of time it takes will depend on how long your hair is. Longer hair will take longer than shorter hair. Using a rat tail comb will help you maintain the curl pattern. Use a hooded dryer to dry your finger coils thoroughly. You can also use a diffuser to get rid of any frizz that may have developed.
If you’re new to finger coiling, it’s important to prep your hair before you start the styling process. First, you’ll need to wash your hair with shampoo and conditioner. Then, use finger coil conditioner or oil. Remember to section the hair into parts so that the finger coils stay in place better.
Apply SKIMDO enhancer

To achieve finger coils, split hair into sections and apply curl-enhancing cream on each section, starting from the root. Then, begin to coil the hair, working from the roots to the tips. Make sure to apply a good amount of setting lotion. This is especially important when you’re working with wet hair, as the cream will help the finger coils stay in place. If you want to maintain your finger coils, you can use a hooded hair dryer or diffuser. To prevent frizz, you can also brush through each section of hair with a hair gel.
Finger coils will last about three weeks. After they have set, you should apply an oil and water mist to keep them fresh. You should also protect your finger coils with a satin bonnet at night to keep them from falling out. This will also prevent them from drying out.
Finger coils are easy to apply and can last for several weeks. The best part is that you can transition them into other styles, such as French rolls or pinup styles. Since finger coils are made using your fingers, they have a more defined coil than other coils. To create finger coils, use a product such as Jane Carter Natural Twist Out Foam. The product provides a medium hold without feeling crunchy.
Apply a hydrator during the day

Applying a hydrator throughout the day will make your finger coils last longer and prevent root puffing. You can apply a product like Design Essentials Twist and Set Lotion during the day to keep your hair moisturized throughout the day. After applying a hydrator, make sure to smooth out your hair’s roots. Dry it under a hooded dryer for an hour or two before styling.
Make sure to moisturize your hair before creating finger coils. This will help them last longer and stay in shape better. Also, you need to be patient when coiling your hair. Do not pull too hard on your scalp, otherwise you might damage the hair and cause fallout. If you’re going to wear finger coils all day, you can apply a curl-refreshing spray before you style it.
Finger coils should last about three weeks, but be sure to moisturize them with oil during the day and use a satin bonnet at night to keep them from getting dry and frizzy. Finger coils should also be protected from frizz at night by using a silk bonnet or scarf.
To create finger coils, prepare your hair as per the instructions of your hair augmentation specialist. Use a sulfate-free shampoo and conditioner. You can also use a rattail comb to part your hair. Next, apply a setting lotion. Apply the cream to your fingers from root to tip. Then, you can wrap them in a silk headband or use elastic bands to hold them in place.
We look forward to your comments and stars under the topic. We thank you 🙂