How to Make Paper Claws Step by Step?
- How to Make Paper Claws Step by Step?
- What Should Be The First Step To Make Paper Claws?
- What Paper Should I Use to Make Paper Claws?
- Are Paper Claws Suitable for Kids?
User Review
( votes)Making paper claws is an easy craft that kids can do. You just need some construction paper and some scissors. To make a claw, fold the left side of the triangle into a crease. Then, fold the right edge of the smaller triangle down to the bottom of the triangle. This part should be folded into the base of the bigger triangle. Then, crease the fold. Place your finger in the fold.

What Should Be The First Step To Make Paper Claws?
First, unfold the paper to make claws. You’ll need two squares of unmarked paper. First, fold the top left corner of the square so that the point is pointing upwards. Next, fold the bottom portion of the triangle over so that it overlaps with the top left corner. Then, fold the left strip in half again, tucking the creases in. Fold it in half, creating a triangle.
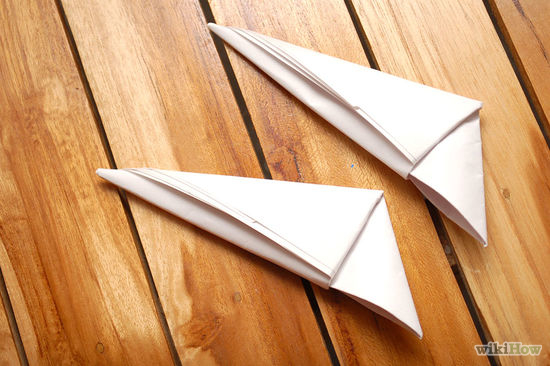
Next, take the second triangle and then fold it in half. Continue this process until you have at least two claws. Then, fold the remaining triangle over. After you are satisfied with your shape, cut the claws and then paste them. You can use any kind of paper, but thicker paper is better. For the claws fold the left side inward, and then the right side over the right triangle. Fold the extra strip over the triangle.
What Paper Should I Use to Make Paper Claws?
To make the claws, use any type of paper. You can use notebook or printer papers. Fold the right-hand corner of the triangle over. Fold the bottom half over. The claw’s knuckle will then be represented by the third triangle. The three sides will need to be glued together. If you’ve followed these steps, you’ll have your very own paper claws!
Once you have cut the paper, fold it over and make the claws. You can make a claw with any kind of paper, though thicker paper is preferable. Begin by folding the top right corner and the left point of the left triangle. Fold the upper part of the triangle and then fold it down. Next, fold the corner in the opposite direction. Next, you will need to fold the remaining two pieces into paper claws.
Make a paper claw by folding up 10 sheets of printer paper. Choosing the color of the paper will depend on your taste. For each claw, it is crucial to use the exact same colour and the same size paper. For the best results, use a dark colored paper, as it is more durable and has more surface area than plain white paper. Next, attach the tips of your claws to glue. Let it dry.
The paper claws should be folded in half. Then, fold each half in half and insert your finger into the claw. Next, place your finger in the middle of the claw. Although your paper claws might be snug at first, they will become more comfortable over time. Then, cut off the top flap of the claw. Then, you’ll have a paper claw! This fun craft project is great for kids!

Are Paper Claws Suitable for Kids?
The claws are an enjoyable craft for kids of all ages. You will need a couple of sheets of printer paper, and a Sharpie Mark. If you’re making them for your child, make sure to keep the claws from touching your child’s face. Make sure they are securely held in place. If they get caught, they’ll be able to run around with them! They can be used as props to create realistic-looking animals!
Paper claws are a great craft idea for children. Ten sheets of printer papers are required. Try to choose square or pointy paper. Your paper claws will be more attractive to kids if you use this method. After you have completed the process, the claws will be ready for your child to play with. Then, they can pretend to be dinosaurs or anything else they like. You can then play with them, making it a great activity.
If you’d like to make a claw for your child, you can use the paper that came with your child’s fingers to scratch the itch. For the easiest claws, simply cut a square piece of paper and fold it into an upside-down triangle. After you have folded the paper, your claws will begin to form. After you have completed the procedure, you are free to play around with your claws.
We look forward to your comments and stars under the topic. We thank you 🙂