How to Make Stickers at Home?
User Review
( votes)Are you looking for an easy and affordable way to create your own stickers? Read this article for tips and tricks on how to make stickers with canva, the free online sticker maker. You can also learn about die cut stickers, using Washi tape, and printing with a cricut machine. The information in this article will make the process easier and quicker for you. Listed below are some of the most useful tools to create your own stickers:
Canva’s free online sticker maker
 You can add text to your stickers with Canva. You can add text to the entire sticker or a single element. To change the font, just highlight it, then click ‘Change’. You can also rotate the sticker to a desired position around the sun. If you want to add a bitmoji or drawing, you can do so too. You can even generate a QR code for your sticker.
The Canva sticker maker is not only free, it also comes with a large template library. You can search for different label designs and create multiple versions of each. You can even print them. And the best part is, you can use Canva for free for 30 days! Try it now and see if you like it! So, if you’re wondering where to download Canva, here’s a quick guide:
Using Canva’s free online sticker maker is easy to use. You can upload your own graphics or images. Then, drag and drop them into the editor to customize the design. If you’re working with other people, you can share your creations and collaborate with them. In addition, the Canva app allows you to add an email address so that you can communicate with the creators. It’s a good idea to have someone else review your designs to ensure they are in good quality.
Canva’s free online sticker maker has an excellent design space. Whether you’re trying to create a sticker for your blog, company website, or other purpose, you can use it in a matter of minutes. You can choose from various shapes and sizes for your stickers, and you can also customize your fonts and colors. And you can share your finished products in no time at all. You can even print stickers on a printer without the need for a professional designer.
Die cut stickers
If you’re looking for a quick way to create your own die-cut stickers, you can use a simple online tool called Graphic. With this tool, you can upload your own artwork or browse pre-made templates and edit their elements to create your own custom die-cut sticker designs. These stickers can be printed on a variety of surfaces and can be customized to fit any occasion. Once you’ve designed your sticker, you can start using it to print and distribute them to your customers.
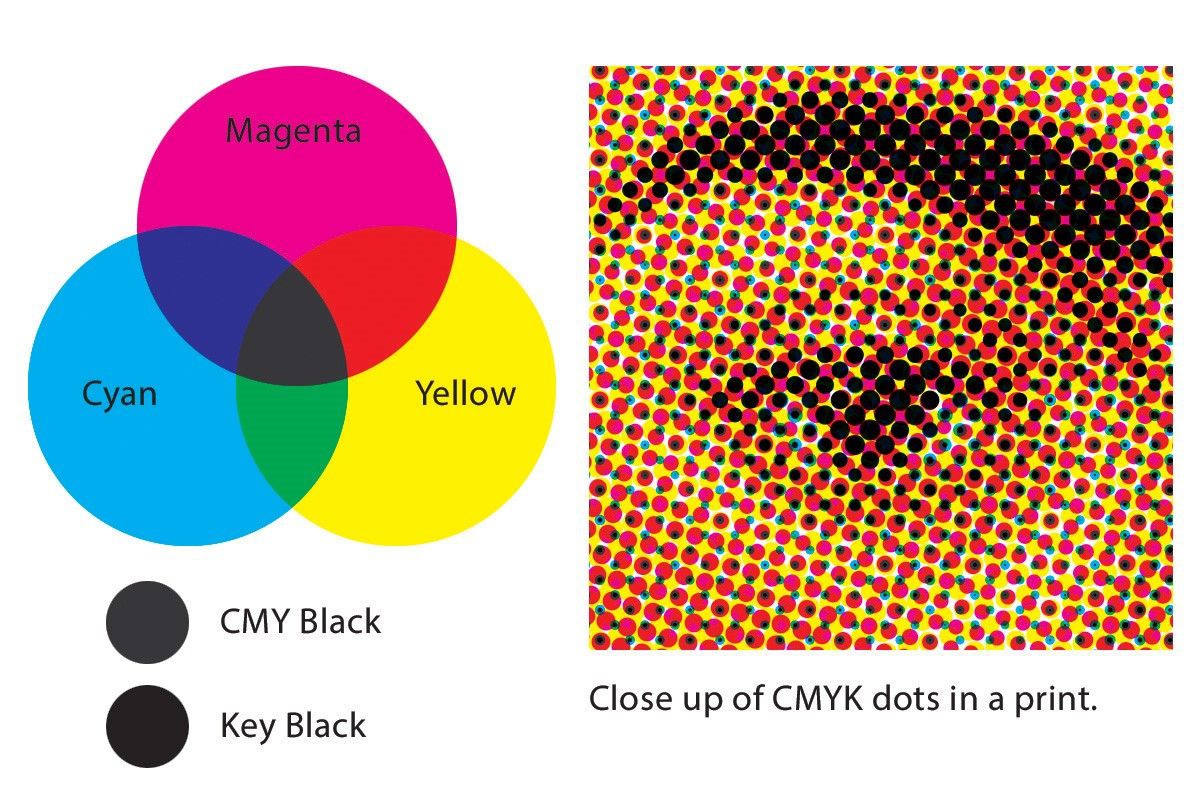
To get started, you’ll need to buy a printer that can print in the CMYK mode. There are many different types of printers on the market, but two popular options are Epson XP-7100, Canon PIXMA PRO-100S, and HP 123D. You’ll need a legitimate barcode to print food product labels, and the size of the font and label must match FDA guidelines. If you’re planning on using your home printer to print your die cut stickers, the process is simple: just feed them into your printer, press print, and they’ll come out perfect!
Aside from these features, die-cut stickers also have a white border around the image area, or “cut line” as they’re also known. The white border makes the sticker stand out on the background and compensates for any irregularities in the cutting process. The cut line automatically appears around the sticker and is between one-eighth inch thick, depending on the size of your image file.
Before you can begin making die-cut stickers, you need to prepare the images correctly. First, ensure that your image has a transparent background. This is essential for die-cutting because you need to prepare the images in a way that the blade will follow. To do this, use the offset tool. The offset tool adds a white or colored border around the image. Once you’ve done this, select the two stickers as one rectangle and save it.
Washi tape
 Washi tape is an excellent material for decorating items, including stickers. It can be used to outline a design or to write words. This versatile tape is also great for decorating a variety of items, such as gift tags, home decor, and more. Follow these simple steps to make your own stickers at home. It’s fun to experiment with new designs and materials! Try it out today! And don’t forget to share your finished creations with your friends!
To make your own stickers, all you need is some masking tape, washi tape, and a few colors of paint. Washi tapes come in many colors and patterns, and are a fantastic way to spice up even the most mundane projects. Choose from a variety of stripes and choose one with a white, green, or black base for your stickers. If you’re feeling particularly creative, try adding different colors and textures to create more striking designs.
You can also use washi tape to decorate envelopes. For envelopes, wax paper or parchment paper will work well. Wax paper is easier to punch through and peel off than parchment paper. Cut out a shape using scrap paper and lay the strips of tape over the parchment paper. Overlap the strips slightly. Then, fold them in half. You’ll have an adorable sticker! And remember that washi tape can be used for a variety of different crafts.
One of the easiest ways to use washi tape is to decorate your own home with unique designs. You can buy washi tape in a variety of colors and patterns. Washi tape is also great for decorating your walls. Besides wall stickers, it can also be used for drawers and cabinets. These designs can make ordinary appliances look chic! And because washi tape is inexpensive, everyone can afford it. Just follow these steps to make your own stickers at home.
Printing with a cricut machine
If you want to print your own sticker designs, the Cricut machine is an excellent tool to do this. The Cricut design space software will automatically add a “bleed” to any printed images before cutting. However, you can turn this feature off if you prefer borderless stickers. You can also create your own designs by adding a white border and sending them to your printer. For more information, read our article on how to print stickers with your Cricut machine.
To print stickers at home, you first need to load your cutting mat into your Cricut machine. You can either use a regular printer or an inkjet printer. When printing with a laser printer, be sure to request inkjet prints since laser printers cannot read the images. The printout should be 100% in size. If you print your design in different sizes, you risk losing the registration marks which are crucial to the accuracy of your sticker cuts.
Secondly, you can print your sticker designs on your own paper. To do this, simply print the stickers on the paper of your choice. The machine will automatically cut them. You can even include invisible borders, if you want. The background of the sticker should be white or transparent. If the background is not transparent, it will not be cut. It is possible to cut out the background of the sticker.
To start the printing process, place the printed sticker paper on your cutting mat. The cut will begin once the Cricut has detected black registration lines. Press the arrow button to unload the mat. Then, check the notch on the sticker before removing it from the machine. The stickers should not curl. If you need to print more stickers, repeat the process. But be sure to use the same computer and browser to avoid registration errors.
Printing with inkjet sticker paper
 If you’re considering printing stickers at home, you can buy inkjet sticker paper for about 20 cents per sheet. There are several factors to consider, though, including the type of printer you have. Using the wrong paper can lead to disastrous results and even cause your printer to break. Using the right paper will help you get a great sticker print. Regardless of the method you choose, it’s important to experiment with your printer and paper, so you can get the best results.
The best way to make the best sticker prints is to use high-quality inkjet stickers. Poorly made stickers will fade quickly and may even damage some surfaces. You can avoid these problems by doing research and testing a small sample sheet. This will allow you to see the quality of the stickers and determine if they’re worth purchasing. It’s also important to consider whether the color accuracy on your display is good or not.
Design your stickers using a photo editing program or word processor. Make sure to use the standard letter-sized document so that you can arrange each sticker on a single page. You can also use a template available from the manufacturer of sticker paper. Make sure you’ve downloaded the latest version of Adobe Photoshop. This program is free and offers basic image editing tools. The software comes with a mobile app, too, which lets you design stickers.
When printing stickers, make sure you choose the right printer settings. Choose an HP printer setting for the best results. Make sure the printing speed is set to “photo quality” and a minimum of two lines per inch. Then, load one sticker paper at a time. Once the sticker paper is loaded, let it dry for a few minutes. After the sticker paper is dry, peel it off the backing to adhere the sticker to your desired surface.
We look forward to your comments and stars under the topic. We thank you 🙂